You use your blender every day to whip up smoothies, sauces, and soups. But when was the last time you cleaned it properly?
If you’ve ever struggled to get rid of stubborn stains or unpleasant odors, you’re not alone. Cleaning your blender the right way not only keeps it looking fresh but also ensures your drinks taste their best and your appliance lasts longer.
In this guide, you’ll discover simple, effective steps to clean your blender quickly and deeply—saving you time and hassle. Ready to make your blender sparkle like new? Let’s dive in!
Daily Cleaning Steps
Keeping your blender clean every day helps keep it fresh and ready to use. Follow simple daily cleaning steps after each use. These steps remove food bits and prevent stains and smells. Daily care also stops bacteria from growing inside your blender. Here are easy ways to clean your blender properly every day.
Rinse Immediately
Rinse the blender jar right after use. Use warm water to wash out leftover food. This stops food from drying and sticking inside the jar. Quick rinsing makes the next cleaning step easier and faster.
Use Soap And Water
Add a few drops of dish soap into the jar. Fill the jar halfway with warm water. Use a sponge or cloth to scrub the sides and blades carefully. Soap breaks down oils and food residue for a clean jar.
Quick Blend Method
Put the jar back on the blender base. Secure the lid tightly. Blend the soapy water on low speed for 20-30 seconds. This helps clean hard-to-reach areas around the blades. The quick blend loosens any stuck particles.
Thorough Rinse And Dry
Pour out the soapy water and rinse the jar with clean water. Check if any soap or food remains. Dry the jar and lid with a clean towel or air dry. Keeping the blender dry stops mold and keeps it fresh.
Credit: www.youtube.com
Removing Tough Residue
Removing tough residue from your blender can be challenging. Leftover food and stains stick to the blades and jar. These residues affect taste and hygiene. Using simple household ingredients can make cleaning easier. Here are effective ways to tackle stubborn residue and keep your blender spotless.
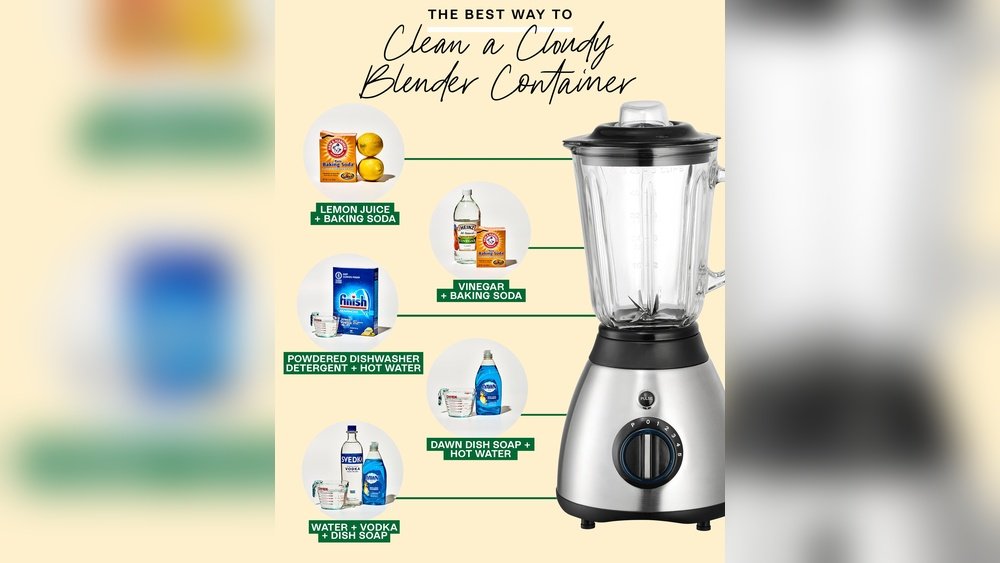
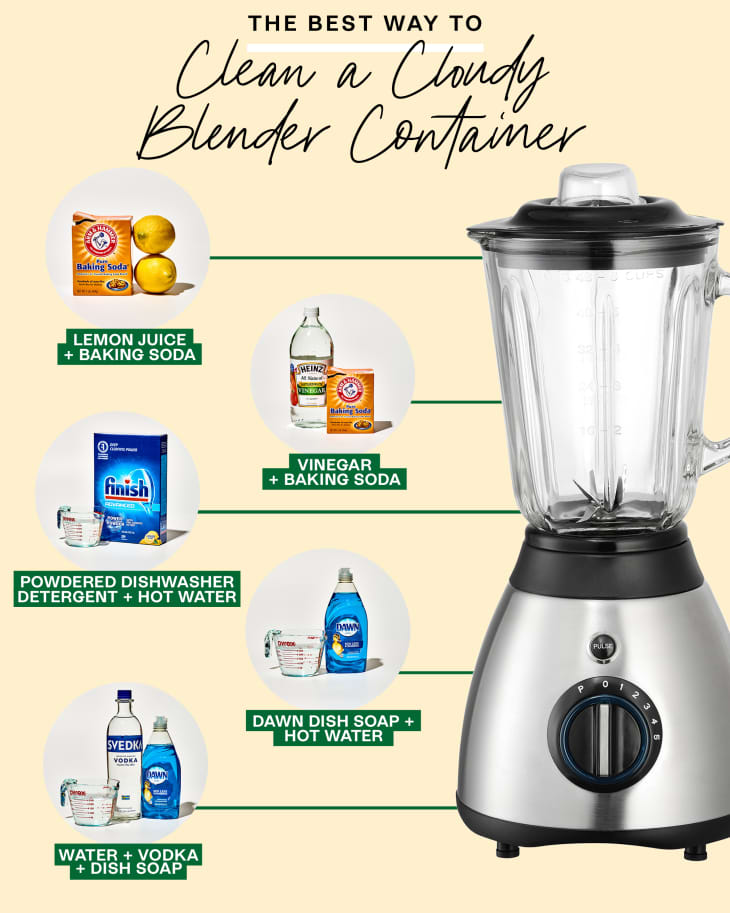
Baking Soda Paste
Baking soda is a gentle abrasive that breaks down residue. Mix baking soda with a little water to form a thick paste. Apply the paste directly to stained areas inside the blender jar. Let it sit for 10 to 15 minutes. Use a soft brush or sponge to scrub the residue. Rinse the jar thoroughly with warm water to remove all paste and grime.
Vinegar And Water Soak
Vinegar helps dissolve sticky buildup and kills bacteria. Fill the blender jar halfway with equal parts white vinegar and warm water. Let the mixture soak for 20 to 30 minutes. Swirl the liquid occasionally to reach all surfaces. After soaking, scrub gently with a sponge. Rinse the jar well to remove vinegar smell and loosened residue.
Lemon For Extra Cleaning Power
Lemon adds freshness and natural cleaning power. Cut a lemon in half and rub it inside the blender jar. Focus on stained or smelly areas. The lemon’s acidity breaks down residue and neutralizes odors. For deeper cleaning, blend lemon juice with water inside the jar. Rinse thoroughly after cleaning to leave a fresh scent.
Deep Cleaning Techniques
Deep cleaning a blender removes stubborn food residues and prevents odors. It keeps your appliance safe and hygienic for daily use. Follow these steps to clean your blender thoroughly. Proper care extends its life and improves performance.
Disassemble Blender Parts
Start by unplugging the blender. Remove the jar from the base. Take off the lid and any detachable seals. Unscrew the blade assembly carefully. Separate all parts to clean each one properly. This process helps reach hidden dirt and food particles.
Clean The Blade Safely
Blades are sharp and need careful handling. Use a brush with stiff bristles to clean them. Avoid touching the edges with bare hands. Rinse blades under warm water to remove stuck debris. Dry the blades thoroughly to prevent rust and damage.
Soak And Scrub Components
Fill a basin with warm water and mild dish soap. Soak the jar, lid, and seals for 10-15 minutes. Use a sponge or soft brush to scrub all surfaces. Focus on crevices and seals where residue builds up. Rinse all parts well with clean water. Let them air dry completely before reassembling.
:max_bytes(150000):strip_icc()/GettyImages-1322052001-dd45ef51e4c646f09286b7bd52e81953.jpg)
Credit: www.southernliving.com
Preventing Odors And Stains
Preventing odors and stains in your blender keeps it fresh and looking new. Regular care stops smells from building up and food colors from sticking. Clean blenders make tastier drinks and save time on tough scrubbing.
Simple habits help maintain your blender’s cleanliness. Use natural ingredients and proper drying to avoid problems. Follow these steps to keep your blender fresh and spotless every day.
Use Baking Soda Regularly
Baking soda removes odors and breaks down stains. Sprinkle a small amount inside the blender jar. Add warm water and let it sit for 15 minutes. Then scrub gently with a soft brush or cloth. Rinse well to remove all residue.
This natural cleaner is safe and effective. Use it once a week to keep your blender smelling clean. It also helps prevent stains from setting in permanently.
Avoid Prolonged Food Residue
Never leave food inside the blender for hours. Food residue causes bad smells and hard stains. Empty and rinse the jar right after use. Wipe the lid and blades carefully to remove hidden bits.
Quick cleaning stops bacteria growth. It also prevents color from fruits or vegetables from staining the plastic. Clean blenders last longer and stay hygienic.
Air Dry Completely
After washing, let your blender dry fully before storing. Moisture traps odors and encourages mold growth. Leave the lid off and place the jar upside down on a drying rack.
Drying well keeps the jar fresh and ready for the next blend. Store your blender in a dry, ventilated place for best results.
Safety Tips
Cleaning a blender can be simple but requires attention to safety. Blades are sharp and can cause injury. The container, made of glass or plastic, needs careful handling to avoid damage. Follow these safety tips to clean your blender properly without risk.
Never Insert Hands Near Blades
Always avoid putting your hands inside the blender near the blades. The blades are very sharp and can cut your fingers easily. Use tools or brushes instead of your hands to clean around the blades. Always unplug the blender before touching the blade area.
Use Brushes And Tools
Use a long-handled brush or sponge to clean inside the blender jar. These tools help reach all corners without direct contact with blades. Soft brushes work well to remove stuck food safely. Avoid using metal scrubbers that can damage the blender surface.
Handle Glass And Plastic With Care
Blender jars can be made of glass or plastic. Handle both types carefully to avoid cracks or breaks. Hold the jar firmly when washing to prevent slipping. Use mild soap and warm water to keep the jar clean and safe for use.
Maintenance For Longevity
Proper maintenance keeps your blender working well for years. Regular care prevents damage and saves money. Small habits extend the appliance’s life and keep it safe to use.
Focus on cleaning, checking parts, and storing the blender correctly. These steps help avoid wear and tear. They also keep your blender fresh and ready for the next use.
Clean After Every Few Uses
Wipe the blender after three or four uses. Rinse the jar with warm water and soap. Run the blender for a few seconds to clean blades inside. Dry all parts before storing to stop mold growth.
Check Seals And Gaskets
Inspect seals and gaskets often for cracks or wear. Replace damaged parts to stop leaks. Clean these parts gently with a soft cloth. Well-maintained seals keep your blender safe and working well.
Store Properly
Store your blender in a dry, cool place. Keep the lid off or loose to prevent odors. Avoid stacking heavy items on it to protect the jar and blades. Proper storage keeps your blender clean and safe.
Credit: www.thekitchn.com
Frequently Asked Questions
How Do You Deep Clean A Blender?
Fill the blender halfway with warm water and dish soap. Blend on high for 30 seconds. Rinse thoroughly. For stubborn stains, blend vinegar and water or scrub with a baking soda paste. Air dry before reassembling. Deep clean every 3-4 uses for best results.
What Is The Easiest Way To Clean A Beautyblender?
The easiest way to clean a Beautyblender is to use warm water and gentle soap. Massage it until suds appear, rinse thoroughly, and air dry. For deeper cleaning, add a drop of olive oil to break down makeup residue before washing.
How To Clean Blender Buildup?
Fill blender halfway with warm water and dish soap. Blend on high for 30 seconds. Rinse thoroughly. For stubborn buildup, blend vinegar and water or scrub with baking soda paste. Let air dry before reuse.
Should I Wash My Blender After Every Use?
Yes, wash your blender after each use to prevent residue buildup and bacteria growth. Quick rinsing with soapy water works well. For stubborn stains, blend vinegar and water or scrub with baking soda paste. Regular cleaning keeps your blender fresh and extends its lifespan.
How Often Should I Clean My Blender For Best Results?
Clean your blender after every use to prevent stains and odors. Deep clean weekly.
Conclusion
Cleaning your blender regularly keeps it fresh and working well. Use warm water, soap, and a quick rinse each time. For tough stains, try baking soda or vinegar solutions. Avoid letting food sit inside to prevent odors. A clean blender makes tasty drinks and meals safer.
Simple steps save time and effort daily. Keep your blender spotless to enjoy smooth blends every time.