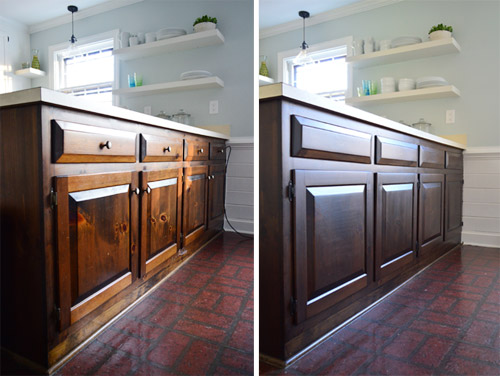
Are your kitchen cabinets looking tired or outdated? Darkening your cabinets with a fresh stain can instantly transform the entire feel of your kitchen, making it look richer and more elegant.
But how do you get that deep, even color without messing up the wood or spending a fortune? If you’ve been wondering how to stain kitchen cabinets darker and achieve a smooth, professional finish, you’re in the right place. In this guide, you’ll discover simple, step-by-step tips that anyone can follow—even if you’re new to staining.
Keep reading to unlock the secrets to making your kitchen cabinets look stunning and refreshed with a darker stain!
Credit: www.younghouselove.com
Preparing Cabinets For Staining
Preparing kitchen cabinets for staining is a crucial step. It ensures the stain adheres well and lasts longer. Proper preparation prevents blotchy or uneven color. Clean, smooth surfaces help the stain soak in evenly. Follow these simple steps before applying any stain to your cabinets.
Removing Doors And Hardware
Start by taking off all cabinet doors and drawers. Remove all handles, knobs, and hinges carefully. Use a screwdriver to avoid damage. Label each door and hardware piece for easy reassembly. This step allows you to work on each part separately. It also protects hardware from stain and damage.
Cleaning And Degreasing Surfaces
Clean all cabinet surfaces thoroughly. Use a degreaser or a mix of warm water and dish soap. Grease and dirt prevent stain from absorbing properly. Wipe with a damp cloth to remove dust. Let the cabinets dry completely before moving on. Clean surfaces ensure a smooth, even finish.
Light Sanding And Scuffing
Lightly sand the cabinet surfaces with fine-grit sandpaper. This removes the old finish and opens the wood pores. Sand just enough to dull the surface; avoid deep sanding. Scuffing helps the stain penetrate better and stick firmly. After sanding, wipe away all dust with a tack cloth or damp rag. A clean, smooth surface is ready for staining.
Credit: www.younghouselove.com
Choosing The Right Stain
Choosing the right stain is key to darkening your kitchen cabinets successfully. The stain type affects color depth, application ease, and durability. Picking a stain that fits your skill level and desired finish makes the project smoother and more satisfying.
Understanding stain options helps you make the best choice. Each stain type has unique features that impact the final look. Consider your cabinet wood and the stain’s properties before deciding.
Gel Vs. Traditional Stains
Gel stains are thick and easy to control. They sit on the surface, giving a rich, even color without blotching. Gel stains work well on cabinets with uneven wood grain. Traditional stains are thinner and soak deep into the wood. They highlight the wood’s natural texture but may require more skill to apply evenly.
Gel stains dry slower, allowing more time to adjust the color. Traditional stains dry faster, which can make touch-ups tricky. Both stains can darken cabinets well but choose based on your comfort and wood type.
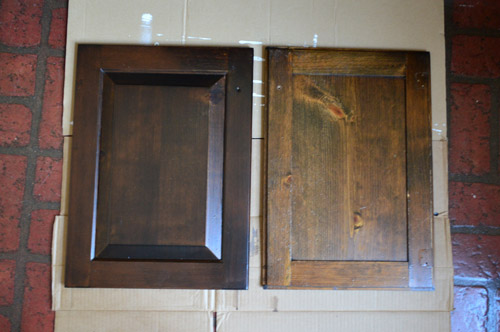
Color Selection Tips
Pick a stain color darker than your current cabinet finish. Test the stain on a small, hidden area first. Wood type affects how the color looks once dry. Different woods absorb stain unevenly, altering the final shade.
Consider the kitchen’s lighting and overall style. Dark stains create a bold, elegant look but can make small kitchens feel smaller. Choose a shade that matches your design goals and complements other kitchen elements.
All-in-one Stain Options
All-in-one stain and finish products save time by combining steps. They stain and seal the wood in one go. This option suits beginners and quick projects. These products offer good protection but may not give the deepest color.
Use all-in-one stains for a simpler process but expect less control over color intensity. For a darker, custom finish, separate stain and topcoat might be better. Balance convenience and desired results when selecting this option.
Applying The Stain
Applying the stain to your kitchen cabinets is a key step to achieve a darker, richer look. This process requires care and the right tools to ensure a smooth, even finish. Proper application brings out the wood’s natural beauty and enhances the cabinet’s style.
Take your time and follow each step carefully. This approach helps prevent blotches and uneven color. Clean surfaces and the right technique will give your cabinets a professional appearance.
Tools And Materials Needed
- Wood stain (choose a dark shade)
- Fine-grit sandpaper (220 grit)
- Lint-free cloths or staining rags
- Foam brushes or natural bristle brushes
- Painter’s tape
- Protective gloves
- Drop cloth or plastic sheeting
- Wood conditioner (optional, for soft woods)
Step-by-step Staining Process
- Lightly sand the cabinets to smooth the surface.
- Remove dust with a clean cloth.
- Apply wood conditioner if needed, following instructions.
- Use a brush or cloth to apply the stain in the wood grain direction.
- Wipe off excess stain with a clean cloth after a few minutes.
- Let the stain dry completely as per product guidelines.
Techniques For Even Coverage
Work in small sections to keep the stain wet and manageable. Brush or wipe in the same direction as the wood grain. Avoid over-applying stain in one spot to prevent blotches. Use smooth, steady strokes for consistent color. Check your work in good light to spot any streaks or missed areas. Wipe excess stain promptly to avoid uneven dark spots.
Multiple Coats For Deeper Color
Apply additional coats after the first one dries fully. Each coat deepens the color and adds richness. Sand lightly between coats with fine-grit sandpaper for smoothness. Clean off dust before applying the next coat. Repeat the stain and wipe process as before. Stop when you reach the desired darkness. Patience is key for a beautiful finish.
:max_bytes(150000):strip_icc()/Urbanology_ProjectHighlandParkPhase2_CostaChristPhotography_8-3458b26e9a33485aa3dc9dd7f9fe6b1f.jpeg)
Credit: www.thespruce.com
Drying And Curing Time
Drying and curing time play a key role in staining kitchen cabinets darker. Proper drying ensures the stain sets well and lasts long. Rushing this process may cause uneven color or damage the finish. Understanding how long to wait after staining helps achieve the best results.
Recommended Waiting Periods
After applying the stain, wait at least 24 hours for it to dry. This allows the surface to become touch-dry and ready for a second coat or finish. For curing, which means the stain fully hardens, expect 3 to 7 days. Avoid heavy use or cleaning during this time. This waiting period helps the stain deepen and protects the wood.
Environmental Factors Affecting Drying
Temperature and humidity impact drying speed. Warm, dry air speeds up drying. Cool or damp environments slow it down. Good air circulation also helps the stain dry evenly. Avoid staining on rainy or very humid days. These factors can cause blotchy or sticky finishes. Control your workspace conditions to get a smooth, rich look.
Sealing And Finishing
Sealing and finishing are key steps to protect your newly stained kitchen cabinets. These steps lock in the color and shield the wood from damage. A good finish also brings out the richness of the dark stain. Choosing the right products and applying them correctly ensures your cabinets look great for years.
Choosing A Durable Top Coat
Select a top coat that resists scratches and water. Polyurethane is a popular choice for kitchen cabinets. It creates a strong, clear barrier over the stain. Oil-based versions offer a warm finish but take longer to dry. Water-based polyurethanes dry faster and have less odor. Pick one that fits your needs and room use.
Application Methods For Finishes
Use a high-quality brush or foam applicator for smooth coverage. Apply thin, even coats to avoid drips and bubbles. Let each coat dry completely before adding the next. Lightly sand between coats with fine-grit sandpaper to smooth the surface. This helps the next layer stick better and creates a polished look.
Protecting Cabinets From Wear
After sealing, care for your cabinets to keep them looking new. Use mild cleaners and soft cloths for cleaning. Avoid harsh chemicals and abrasive scrubbers. Fix scratches quickly by touching up with matching stain or finish. Use cabinet liners inside drawers to prevent damage. Regular maintenance extends the life of your finish.
Tips For Maintenance And Touch-ups
Maintaining dark-stained kitchen cabinets keeps them looking fresh and beautiful. Regular care prevents damage and fading. Small issues can be fixed with simple touch-ups. Follow these tips to preserve your cabinets’ rich color and smooth finish.
Cleaning Stained Cabinets
Use a soft cloth and mild soap to clean your cabinets. Avoid harsh chemicals that strip the stain. Wipe spills quickly to stop stains from setting. Clean regularly to remove dust and grease. Dry cabinets with a clean cloth to prevent water damage.
Fixing Minor Scratches
Light scratches do not need full refinishing. Use a wood touch-up marker or crayon matching your stain color. Apply gently and blend with a soft cloth. For deeper scratches, use fine sandpaper to smooth the area. Reapply stain and finish to restore the look.
When To Refinish
Refinish cabinets if the stain fades or peels. Also refinish if scratches and damage cover large areas. Signs include dull color and rough texture. Refinishing involves sanding, staining, and sealing again. Plan refinishing every few years for best results.
Common Mistakes To Avoid
Staining kitchen cabinets darker can refresh your kitchen’s look. Avoid mistakes that ruin your work. These common errors make staining uneven or blotchy. Careful preparation and technique help get the right finish.
Skipping Sanding Or Preparation
Do not skip sanding before staining. Sanding removes old finish and smooths wood. Without it, stain may not soak evenly. Clean cabinets well to remove dust and grease. This step helps the stain stick better and last longer.
Applying Too Much Stain At Once
Apply stain in thin, even coats. Using too much stain can cause drips and blotches. Thick layers take longer to dry and look uneven. Wipe off extra stain quickly with a clean cloth. Multiple thin coats give a richer, smoother color.
Ignoring Drying Times
Wait the full drying time between coats. Rushing this step leads to sticky or patchy finish. Drying times vary by stain type and weather. Follow the instructions on the stain label. Proper drying ensures a durable, even color.
Frequently Asked Questions
Can I Stain My Kitchen Cabinets Darker Without Sanding?
Yes, you can stain cabinets darker without full sanding by lightly scuffing the surface. This helps the stain adhere better and last longer. Use gel stain for easier application and a smooth finish. Always apply a protective top coat to seal and protect your cabinets.
What Color Kitchen Is In For 2026?
For 2026, kitchen colors favor soft greens, dusty sages, and rich navy tones. These nature-inspired hues create a calming, timeless atmosphere. Expect these shades on islands, lower cabinets, and full kitchen designs, blending modern style with classic appeal.
Does Applying Multiple Coats Of Stain Make It Darker?
Yes, applying multiple coats of stain deepens the color and makes the wood appear darker. Allow each coat to dry before applying the next for even results. Avoid over-application to prevent blotchiness and ensure a smooth, rich finish.
Can I Stain Over Already Stained Cabinets?
Yes, you can stain over already stained cabinets. Lightly sand or scuff the surface first for better stain adhesion. Use gel stain for an even finish. Apply multiple coats if needed, and protect with a durable top coat to ensure longevity and water resistance.
Conclusion
Staining kitchen cabinets darker can refresh your entire kitchen look. Start with light sanding to help the stain stick well. Apply the stain evenly and allow it to dry completely. Multiple coats can deepen the color if needed. Always wipe off excess stain to avoid blotches.
Take your time and work carefully for the best results. A darker stain adds warmth and style to your cabinets. Enjoy your newly transformed kitchen space with confidence.